![[C# Helper]](../banner260x75.png)
|
|
 |
![[Beginning Database Design Solutions, Second Edition]](db2_79x100.png)
![[Beginning Software Engineering, Second Edition]](book_sw_eng2_79x100.png)
![[Essential Algorithms, Second Edition]](book_algs2e_79x100.png)
![[The Modern C# Challenge]](book_csharp_challenge_80x100.jpg)
![[WPF 3d, Three-Dimensional Graphics with WPF and C#]](book_wpf3d_80x100.png)
![[The C# Helper Top 100]](book_top100_80x100.png)
![[Interview Puzzles Dissected]](book_interview_puzzles_80x100.png)
![[C# 24-Hour Trainer]](book_csharp24hr_2e_79x100.jpg)
![[C# 5.0 Programmer's Reference]](book_csharp_prog_ref_80x100.png)
![[MCSD Certification Toolkit (Exam 70-483): Programming in C#]](book_c_cert_80x100.jpg)

Title: Draw a 3D surface with WPF, XAML, and C#
With the background provided by the post Understand 3D drawing with WPF, XAML, and C#, you're ready to use code to draw a 3D surface. Sorry this post is pretty long, but it demonstrates all of the techniques you need to use to draw three-dimensional surfaces and most of the techniques you need to draw more general three-dimensional models. Later posts will show how to modify this one so they won't be as long. Because you'll be using these techniques a lot in the upcoming examples, pay attention to this one.
XAML CodeThe following text shows the program's XAML code.
<Window x:Class="howto_3D_draw_surface.Window1" xmlns="http://schemas.microsoft.com/winfx/2006/xaml/presentation" xmlns:x="http://schemas.microsoft.com/winfx/2006/xaml" Title="howto_3D_draw_surface" Height="500" Width="500" Loaded="Window_Loaded" KeyDown="Window_KeyDown"> <Grid> <Viewport3D Grid.Row="0" Grid.Column="0" Name="MainViewport" /> </Grid> </Window> This is pretty much the smallest XAML program that is useful for three-dimensional drawing. After the Window declaration, which defines Loaded and KeyDown event handlers, the code simply uses a Grid as its root element. The Grid contains a Viewport that will display all of the three-dimensional graphics. The actual drawing occurs in the program's C# code.
Managing the CameraThe program uses the following module-level declarations to manage its drawing objects.
// The main object model group. private Model3DGroup MainModel3Dgroup = new Model3DGroup(); // The camera. private PerspectiveCamera TheCamera; // The camera's current location. private double CameraPhi = Math.PI / 6.0; // 30 degrees private double CameraTheta = Math.PI / 6.0; // 30 degrees private double CameraR = 3.0; // The change in CameraPhi when you press up/down arrow. private const double CameraDPhi = 0.1; // The change in CameraTheta when you press left/right arrow. private const double CameraDTheta = 0.1; // The change in CameraR when you press + or -. private const double CameraDR = 0.1; This code defines a Model3DGroup object to hold the three-dimensional model. It also defines a camera to view the model. Next the program defines some values that it uses to track the camera's position. The CameraPhi, CameraTheta, and CameraR values store the camera's position in polar coordinates. (For information about polar coordinate, see Wikipedia or Wolfram MathWorld.) The values CameraDPhi, CameraDTheta, and CameraDR hold the amounts by which the polar coordinates are modified when you press various keys to move the camera. For example, when you press +, CameraR decreases by CameraDR so the camera moves closer to the origin.
Getting StartedWhen the program starts, the following Window_Loaded event handler executes.
// Create the scene. // MainViewport is the Viewport3D defined // in the XAML code that displays everything. private void Window_Loaded(object sender, RoutedEventArgs e) { // Give the camera its initial position. TheCamera = new PerspectiveCamera(); TheCamera.FieldOfView = 60; MainViewport.Camera = TheCamera; PositionCamera(); // Define lights. DefineLights(); // Create the model. DefineModel(MainModel3Dgroup); // Add the group of models to a ModelVisual3D. ModelVisual3D model_visual = new ModelVisual3D(); model_visual.Content = MainModel3Dgroup; // Add the main visual to the viewportt. MainViewport.Children.Add(model_visual); } This code creates the camera and calls PositionCamera to place it in its initial position. It then calls DefineLights and DefineModel to define the scene's lights and 3D object model. The code finishes by making a ModelVisual3D object to hold the Model3DGroup, and adds the ModelVisual3D to the Viewport defined in the XAML code. (This step is somewhat confusing, but it's the same startup step you'll use for any similar program so you only need to figure out the code once. You can just copy this part of the code for future projects.) The rest of the program consists of the methods that define the lights, position and move the camera, and build the 3D object model.
Making LightsThe following code shows the DefineLights method.
// Define the lights. private void DefineLights() { AmbientLight ambient_light = new AmbientLight(Colors.Gray); DirectionalLight directional_light = new DirectionalLight(Colors.Gray, new Vector3D(-1.0, -3.0, -2.0)); MainModel3Dgroup.Children.Add(ambient_light); MainModel3Dgroup.Children.Add(directional_light); } This code simply creates an ambient light and a directional light, and adds them to the model.
Making the ModelThe following code shows how the program defines the drawing surface.
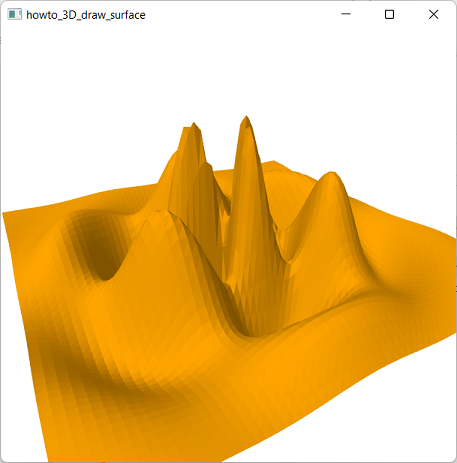
// Add the model to the Model3DGroup. private void DefineModel(Model3DGroup model_group) { // Make a mesh to hold the surface. MeshGeometry3D mesh = new MeshGeometry3D(); // Make the surface's points and triangles. const double xmin = -1.5; const double xmax = 1.5; const double dx = 0.05; const double zmin = -1.5; const double zmax = 1.5; const double dz = 0.05; for (double x = xmin; x <= xmax - dx; x += dx) { for (double z = zmin; z <= zmax - dz; z += dx) { // Make points at the corners of the surface // over (x, z) - (x + dx, z + dz). Point3D p00 = new Point3D(x, F(x, z), z); Point3D p10 = new Point3D(x + dx, F(x + dx, z), z); Point3D p01 = new Point3D(x, F(x, z + dz), z + dz); Point3D p11 = new Point3D(x + dx, F(x + dx, z + dz), z + dz); // Add the triangles. AddTriangle(mesh, p00, p01, p11); AddTriangle(mesh, p00, p11, p10); } } // Make the surface's material using a solid orange brush. DiffuseMaterial surface_material = new DiffuseMaterial(Brushes.Orange); // Make the mesh's model. GeometryModel3D surface_model = new GeometryModel3D(mesh, surface_material); // Make the surface visible from both sides. surface_model.BackMaterial = surface_material; // Add the model to the model groups. model_group.Children.Add(surface_model); } The code makes a new MeshGeometry3D object to hold the surface's triangles. It then loops over the region -1.5 ≤ X ≤ 1.5, -1.5 ≤ Z ≤ 1.5 and uses the function F (described shortly) to generate points on the surface. It uses those points and the AddTriangle method (described later) to define triangles for the 3D model. After it generates the triangles, the code makes an orange material and uses it plus the 3D model to create a GeometryModel3D object to represent both. It sets the model's BackMaterial property to the same material, so the surface is visible from both sides. Finally the code adds the model to the main model group.
Generating DataThe following code shows the function F that defines the surface.
// The function that defines the surface we are drawing. private double F(double x, double z) { const double two_pi = 2 * 3.14159265; double r2 = x * x + z * z; double r = Math.Sqrt(r2); double theta = Math.Atan2(z, x); return Math.Exp(-r2) * Math.Sin(two_pi * r) * Math.Cos(3 * theta); } This function "simply" calculates and returns the following value:

Adding TrianglesThe following code shows the AddTriangle method.
// Add a triangle to the indicated mesh. private void AddTriangle(MeshGeometry3D mesh, Point3D point1, Point3D point2, Point3D point3) { // Get the points' indices. int index1 = AddPoint(mesh.Positions, point1); int index2 = AddPoint(mesh.Positions, point2); int index3 = AddPoint(mesh.Positions, point3); // Create the triangle. mesh.TriangleIndices.Add(index1); mesh.TriangleIndices.Add(index2); mesh.TriangleIndices.Add(index3); } This method adds three points to a mesh and then adds indices to the mesh to define a triangle.
Moving the CameraThat's all the code that sets up the 3D model. The remaining code lets you move the camera so you can view the surface from different positions. The following code shows how the program changes the camera position when you press various keys.
// Adjust the camera's position. private void Window_KeyDown(object sender, KeyEventArgs e) { switch (e.Key) { case Key.Up: CameraPhi += CameraDPhi; if (CameraPhi > Math.PI / 2.0) CameraPhi = Math.PI / 2.0; break; case Key.Down: CameraPhi -= CameraDPhi; if (CameraPhi < -Math.PI / 2.0) CameraPhi = -Math.PI / 2.0; break; case Key.Left: CameraTheta += CameraDTheta; break; case Key.Right: CameraTheta -= CameraDTheta; break; case Key.Add: case Key.OemPlus: CameraR -= CameraDR; if (CameraR < CameraDR) CameraR = CameraDR; break; case Key.Subtract: case Key.OemMinus: CameraR += CameraDR; break; } // Update the camera's position. PositionCamera(); } This code updates the camera's polar coordinates appropriately for the key you pressed. For example, if you press Left Arrow, the program increases the angle CameraTheta to rotate the camera around the Y axis. After it updates the camera's coordinates, the code calls the following PositionCamera method to move the camera to its new position.
// Position the camera. private void PositionCamera() { // Calculate the camera's position in Cartesian coordinates. double y = CameraR * Math.Sin(CameraPhi); double hyp = CameraR * Math.Cos(CameraPhi); double x = hyp * Math.Cos(CameraTheta); double z = hyp * Math.Sin(CameraTheta); TheCamera.Position = new Point3D(x, y, z); // Look toward the origin. TheCamera.LookDirection = new Vector3D(-x, -y, -z); // Set the Up direction. TheCamera.UpDirection = new Vector3D(0, 1, 0); } This method converts the camera's polar coordinates into Cartesian coordinates, and sets the camera's position. It sets the camera's "look" direction so it is pointing towards the origin. Finally it sets the "up" direction so the camera is oriented more or less vertically. Simple, right? Actually the program is fairly long but it's not too bad if you focus on each piece separately. The program creates and positions the camera, defines lights, and builds a 3D object model consisting of triangles. The good news is that you can use this program as a template for future programs without building everything from scratch. My next few posts will do just that to show how you can build a smooth three-dimensional surface efficiently. Later posts will show how to build other three-dimensional objects. Download the example to experiment with it and to see additional details. |
![[WPF 3d]](../book_wpf3d_244x300.png "WPF 3d")