![[C# Helper]](../banner260x75.png)
|
|
 |
![[Beginning Database Design Solutions, Second Edition]](db2_79x100.png)
![[Beginning Software Engineering, Second Edition]](book_sw_eng2_79x100.png)
![[Essential Algorithms, Second Edition]](book_algs2e_79x100.png)
![[The Modern C# Challenge]](book_csharp_challenge_80x100.jpg)
![[WPF 3d, Three-Dimensional Graphics with WPF and C#]](book_wpf3d_80x100.png)
![[The C# Helper Top 100]](book_top100_80x100.png)
![[Interview Puzzles Dissected]](book_interview_puzzles_80x100.png)
![[C# 24-Hour Trainer]](book_csharp24hr_2e_79x100.jpg)
![[C# 5.0 Programmer's Reference]](book_csharp_prog_ref_80x100.png)
![[MCSD Certification Toolkit (Exam 70-483): Programming in C#]](book_c_cert_80x100.jpg)

Title: Draw a smooth 3D surface with WPF, XAML, and C#
My post Draw a 3D surface with WPF, XAML, and C# explains how to use WPF, XAML, and C# to draw a three-dimensional surface. The following list recaps the main steps.
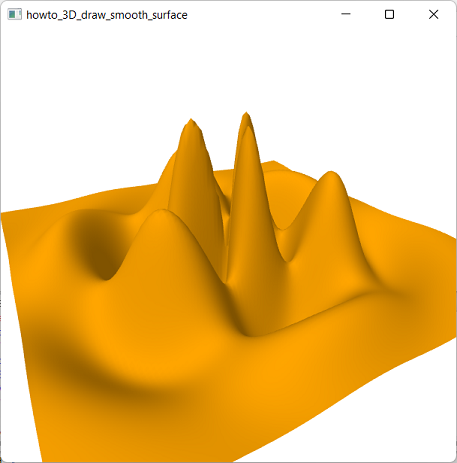
Simple, right? Actually it's not too bad if you use the previous example as a template for new programs. One problem with the previous example is that it doesn't draw a smooth surface. If you look at that program's result, you can see the triangles that make up the surface. The reason you see each triangle is that the program doesn't supply vertex normal information. The rendering engine calculates each triangle's normal separately and uses those calculated normals to shade the triangles. You could define normals for each of the surface's points, but that would be a lot of work, particularly because you'd have to find the derivative of the messy function that generates the surface. Fortunately there's an easier approach. If two triangles share a vertex (i.e. use the same index in the TriangleIndices collection), then by default the rendering engine uses an average of their normals for the normal at that point. The previous example didn't get this benefit because it added each triangle's vertices to the mesh's Positions collection separately so the triangles didn't share vertices. To fix this, the new example reuses any vertices that are already in the Positions collection. The following code shows how the program adds a new triangle to its mesh.
// Add a triangle to the indicated mesh. // If the triangle's points already exist, reuse them. private void AddTriangle(MeshGeometry3D mesh, Point3D point1, Point3D point2, Point3D point3) { // Get the points' indices. int index1 = AddPoint(mesh.Positions, point1); int index2 = AddPoint(mesh.Positions, point2); int index3 = AddPoint(mesh.Positions, point3); // Create the triangle. mesh.TriangleIndices.Add(index1); mesh.TriangleIndices.Add(index2); mesh.TriangleIndices.Add(index3); } This method calls the AddPoint method (described next) to add the triangle's vertices to the mesh's Positions collection. The AddPoint method returns the index of a point in that collection. The code then adds the vertices' indices to the mesh's TriangleIndices collection to define the triangle. The following code shows the AddPoint method.
// If the point already exists, return its index. // Otherwise create the point and return its new index. private int AddPoint(Point3DCollection points, Point3D point) { // See if the point exists. for (int i = 0; i < points.Count; i++) { if ((point.X == points[i].X) && (point.Y == points[i].Y) && (point.Z == points[i].Z)) return i; } // We didn't find the point. Create it. points.Add(point); return points.Count - 1; } This code loops through the mesh's Positions collection to see if the desired point is already there. If it is, the method returns the point's index in the collection. If the point isn't there, the method adds it and returns the new point's index. Because the triangles reuse existing vertices, they share any vertices they can. The result is the smooth surface you see at the top of the post. Download the example to experiment with it and to see additional details. |
![[WPF 3d]](../book_wpf3d_244x300.png "WPF 3d")