![[C# Helper]](../banner260x75.png)
|
|
 |
![[Beginning Database Design Solutions, Second Edition]](db2_79x100.png)

Title: Easily save and restore CheckedListBox values in the Registry in C#
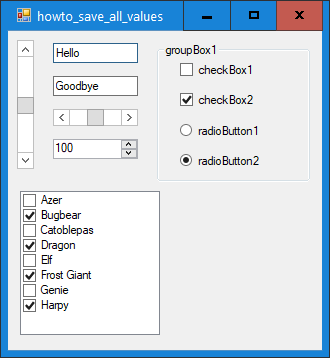
The example Easily save and restore a form's settings in the Registry in C# shows one way to save a form's settings and the values placed in its controls. That example really just demonstrates the basic ideas and shows how to save the values in a few kinds of controls. This example extends the previous one to save and restore the items that are checked in a CheckedListBox control.
Saving ValuesThe program's SaveAllSettings method saves the form's width, height, and position. It then calls the SaveChildSettings method passing it the form in its parent parameter. The SaveChildSettings method loops through the parent's child controls. It uses a switch statement to save the values that are appropriate for each child. The following code shows the new case for a CheckedListBox control.
case "CheckedListBox": CheckedListBox lst = child as CheckedListBox; for (int i = 0; i < lst.Items.Count; i++) { // Default is false. if (lst.GetItemChecked(i)) { string item_name = child.Name + "(" + i.ToString() + ")"; SaveSetting(app_name, item_name, "True"); } } break; This code converts the generic child object into a CheckedListBox and then loops through the indices of the control's items. For each item, the code uses the list's GetItemChecked method to determine whether the item is checked. If the item is checked, the code creates the item's name consisting of the control's name plus the item's index inside parentheses. For example, the clbMonster control's item number 4 would have the name "clbMonster(4)." The code then calls the SaveSetting method to save the value "True" for the item. (See the previous example for a description of the SaveSetting method.) Notice that the code does not save a value for items that are not checked. When it reloads the values, the program assumes that any missing values are false. After it has saved the child control's values, the SaveChildSettings method recursively calls itself to process the children of the child (if it has any).
Loading ValuesThe code that loads values follows a similar pattern to the one used to save values. The LoadAllSettings method loads the form's dimensions and position, and then calls the LoadChildSettings method, passing it the form as the parent parameter. The LoadChildSettings method loops through the parent's child controls and uses a switch statement to save appropriate values. The following code shows the case for the CheckedListBox control.
case "CheckedListBox": CheckedListBox lst = child as CheckedListBox; for (int i = 0; i < lst.Items.Count; i++) { // Default is false. string item_name = child.Name + "(" + i.ToString() + ")"; bool is_checked = bool.Parse(GetSetting(app_name, item_name, "False").ToString()); lst.SetItemChecked(i, is_checked); } break; This code converts the child control into a CheckedListBox and then loops through its items. For each item, the code composes the item's name as before. It then calls the GetSetting method to get the item's value using the default value False. The code parses the result as a Boolean value and uses the list's SetItemChecked method to check or uncheck the item.
SummaryThe code shown here only handles CheckedListBox controls. See the previous post for additional details such as how the code handles other control types. Using similar techniques, you should be able to add other control types if you need them. This example uses a single form. It's Load and FormClosing event handlers load and save settings, respectively. You should be able to use a similar technique to save and restore settings for multiple forms. Simply use different app names for the different forms. Alternatively you could prepend the form's name to each of the control names. You can also use a similar approach to save and restore settings in places other than the Registry. For example, you could save values in a text, XML, JSON, or settings file. Download the example to experiment with it and to see additional details. |
![[Beginning Software Engineering, Second Edition]](book_sw_eng2_79x100.png)
![[Essential Algorithms, Second Edition]](book_algs2e_79x100.png)
![[The Modern C# Challenge]](book_csharp_challenge_80x100.jpg)
![[WPF 3d, Three-Dimensional Graphics with WPF and C#]](book_wpf3d_80x100.png)
![[The C# Helper Top 100]](book_top100_80x100.png)
![[Interview Puzzles Dissected]](book_interview_puzzles_80x100.png)
![[C# 24-Hour Trainer]](book_csharp24hr_2e_79x100.jpg)
![[C# 5.0 Programmer's Reference]](book_csharp_prog_ref_80x100.png)
![[MCSD Certification Toolkit (Exam 70-483): Programming in C#]](book_c_cert_80x100.jpg)
