Title: Print data in rows and columns in C#

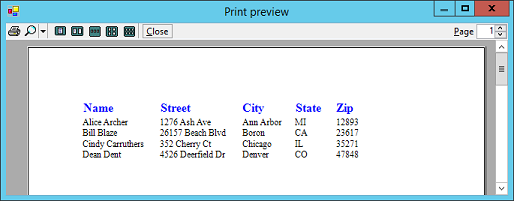
This example shows how you can print data in rows and columns with column headers.
The example uses the following code to initialize the data.
// The sample data.
private string[] Headers =
{"Name", "Street", "City", "State", "Zip"};
private string[,] Data =
{
{"Alice Archer", "1276 Ash Ave", "Ann Arbor", "MI", "12893"},
{"Bill Blaze", "26157 Beach Blvd", "Boron", "CA", "23617"},
{"Cindy Carruthers", "352 Cherry Ct", "Chicago", "IL", "35271"},
{"Dean Dent", "4526 Deerfield Dr", "Denver", "CO", "47848"},
};
When you click the program's Print Preview button, the following code invokes the PrintPreviewDialog's ShowDialog method.
// Display a print preview.
private void btnPrintPreview_Click(object sender, EventArgs e)
{
ppdGrid.ShowDialog();
}
The PrintPreviewDialog's PrintDocument property is set to a PrintDocument object that does the actual printing. That object's PrintPage event handler generates the page that the program prints. That event handler, which is shown in the following code, is where most of the work happens.
// Print the document's page.
// Note that this version doesn't handle multiple pages.
private void pdocGrid_PrintPage(object sender,
System.Drawing.Printing.PrintPageEventArgs e)
{
// Use this font.
using (Font header_font = new Font("Times New Roman",
16, FontStyle.Bold))
{
using (Font body_font = new Font("Times New Roman", 12))
{
// We'll skip this much space between rows.
int line_spacing = 20;
// See how wide the columns must be.
int[] column_widths = FindColumnWidths(
e.Graphics, header_font, body_font, Headers, Data);
// Start at the left margin.
int x = e.MarginBounds.Left;
// Print by columns.
for (int col = 0; col < Headers.Length; col++)
{
// Print the header.
int y = e.MarginBounds.Top;
e.Graphics.DrawString(Headers[col],
header_font, Brushes.Blue, x, y);
y += (int)(line_spacing * 1.5);
// Print the items in the column.
for (int row = 0; row <=
Data.GetUpperBound(0); row++)
{
e.Graphics.DrawString(Data[row, col],
body_font, Brushes.Black, x, y);
y += line_spacing;
}
// Move to the next column.
x += column_widths[col];
} // Looping over columns
} // using body_font
} // using header_font
//DrawGrid(e, y)
e.HasMorePages = false;
}
The event handler creates fonts for the grid's column headers and the values. It then calls the FindColumnWidths method to see how wide each column must be to hold its data.
Next the code sets variable x to the page's left margin and loops through the columns.
For each column, the code sets variable y to the page's top margin. It then displays the column's header and increases y to move down the page. It then loops through the data for that column, drawing each value at the current (x, y) position and increasing y to move down the page again.
After it finishes printing a column's values, the code increases variable x by the width of the column so the next column appears to the right.
The following code shows the FindColumnWidths method.
// Figure out how wide each column should be.
private int[] FindColumnWidths(Graphics gr, Font header_font,
Font body_font, string[] headers, string[,] values)
{
// Make room for the widths.
int[] widths = new int[headers.Length];
// Find the width for each column.
for (int col = 0; col < widths.Length; col++)
{
// Check the column header.
widths[col] = (int)gr.MeasureString(
headers[col], header_font).Width;
// Check the items.
for (int row = 0; row <= values.GetUpperBound(0); row++)
{
int value_width = (int)gr.MeasureString(
values[row, col], body_font).Width;
if (widths[col] < value_width)
widths[col] = value_width;
}
// Add some extra space.
widths[col] += 20;
}
return widths;
}
This code creates an array to hold column widths.
For each column, the code sets the column's width to the width of its header. It then loops through the column's values. If a value's width is greater than the column's current width, the program updates the column's width. After it has check all of the values, the code adds some extra space so the values in the grid aren't too close together.
Download the example to experiment with it and to see additional details.
|
![[C# Helper]](../banner260x75.png)

![[Beginning Database Design Solutions, Second Edition]](db2_79x100.png)
![[Beginning Database Design Solutions, Second Edition]](db2_79x100.png)