![[C# Helper]](../banner260x75.png)
|
|
 |
![[Beginning Database Design Solutions, Second Edition]](db2_79x100.png)

Title: Draw lines with custom end caps in C#
This example shows how you can add custom end caps to lines. When you use a Pen object to draw lines and curves, you can set its CustomStartCap and CustomEndCap properties to determine how the ends of the line are drawn. Those properties take values of type CustomLineCap.
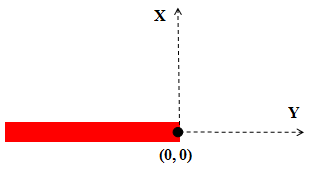
A CustomLineCap can represent a shape that is either filled or outlined but not both. You define the shape and determine whether it is filled or outlined by passing a GraphicsPath object to its constructor. The constructor takes two parameters representing the fill path and stroke path, and one of those should be null. Furthermore if you use a fill path, it should intercept the negative Y axis. (Yes this is all rather arcane. See CustomLineCap.CustomLineCap(GraphicsPath, GraphicsPath) Constructor for more details.)
The units for the GraphicsPaths are measured in line thicknesses, so the result scales if the Pen is thick or if the Graphics object on which you're drawing is transformed. For example, suppose a GraphicsPath contains a circle of radius 5. If the program uses the custom line cap with a Pen that has thickness 10, then the result is a circle with a radius of 5 × 10 = 50 pixels on the screen. The following code shows how the example draws.
private void Form1_Paint(object sender, PaintEventArgs e) { e.Graphics.SmoothingMode = SmoothingMode.AntiAlias; // Make a GraphicsPath to define the start cap. using (GraphicsPath start_path = new GraphicsPath()) { start_path.AddArc(-2, 0, 4, 4, 180, 180); // Make the start cap. using (CustomLineCap start_cap = new CustomLineCap(null, start_path)) { // Make a GraphicsPath to define the end cap. using (GraphicsPath end_path = new GraphicsPath()) { end_path.AddLine(0, 0, -2, -2); end_path.AddLine(0, 0, 2, -2); // Make the end cap. using (CustomLineCap end_cap = new CustomLineCap(null, end_path)) { // Make a pen that uses the custom caps. using (Pen the_pen = new Pen(Color.Blue, 5)) { the_pen.CustomStartCap = start_cap; the_pen.CustomEndCap = end_cap; // Draw a line. e.Graphics.DrawLine(the_pen, 40, 40, 200, 40); // Draw a polygon. PointF[] points = new PointF[] { new PointF(40, 80), new PointF(120, 100), new PointF(230, 70), }; the_pen.Color = Color.Green; e.Graphics.DrawLines(the_pen, points); // Draw a transformed arc. e.Graphics.ScaleTransform(3, 1); the_pen.Color = Color.Red; e.Graphics.DrawArc(the_pen, 20, 120, 70, 60, 180, 270); } } } } } } The CustomLineCap, GraphicsPath, and Pen classes all implement the IDisposable interface, so the code creates them all in using statements. That gives the code a fairly deep nesting level but ensures that their Dispose methods are called when the objects are no longer needed. The code first creates a GraphicsPath to define a starting line cap. It adds a semi-circular arc to the object. It then creates a CustomLineCap object, passing its constructor the GraphicsPath object for the stroke path parameter. The code then repeats those steps to make an ending line cap. Next the program creates a 5-pixel wide blue Pen and sets its CustomStartCap and CustomEndCap properties to the CustomLineCap objects it created. The program then draws a line, a series of 2 lines, and a scaled arc. Notice how each of the curves drawn in the original picture start with a semi-circle and end with an arrowhead. Notice also how the end caps for the scaled red arc have also been scaled. By using custom end caps, you can draw arrowheads and other connecting symbols on the ends of curves easily. Download the example to experiment with it and to see additional details. |
![[Beginning Software Engineering, Second Edition]](book_sw_eng2_79x100.png)
![[Essential Algorithms, Second Edition]](book_algs2e_79x100.png)
![[The Modern C# Challenge]](book_csharp_challenge_80x100.jpg)
![[WPF 3d, Three-Dimensional Graphics with WPF and C#]](book_wpf3d_80x100.png)
![[The C# Helper Top 100]](book_top100_80x100.png)
![[Interview Puzzles Dissected]](book_interview_puzzles_80x100.png)
![[C# 24-Hour Trainer]](book_csharp24hr_2e_79x100.jpg)
![[C# 5.0 Programmer's Reference]](book_csharp_prog_ref_80x100.png)
![[MCSD Certification Toolkit (Exam 70-483): Programming in C#]](book_c_cert_80x100.jpg)
![[Draw lines with custom end caps in C#]](howto_custom_end_caps.png)
 The
The