![[C# Helper]](../banner260x75.png)
|
|
 |
![[Beginning Database Design Solutions, Second Edition]](db2_79x100.png)
![[Beginning Software Engineering, Second Edition]](book_sw_eng2_79x100.png)
![[Essential Algorithms, Second Edition]](book_algs2e_79x100.png)
![[The Modern C# Challenge]](book_csharp_challenge_80x100.jpg)
![[WPF 3d, Three-Dimensional Graphics with WPF and C#]](book_wpf3d_80x100.png)
![[The C# Helper Top 100]](book_top100_80x100.png)
![[Interview Puzzles Dissected]](book_interview_puzzles_80x100.png)
![[C# 24-Hour Trainer]](book_csharp24hr_2e_79x100.jpg)
![[C# 5.0 Programmer's Reference]](book_csharp_prog_ref_80x100.png)
![[MCSD Certification Toolkit (Exam 70-483): Programming in C#]](book_c_cert_80x100.jpg)

Title: Apply textures to triangles using WPF and C#
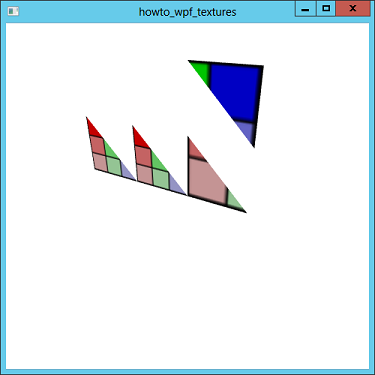
This example shows how to apply textures to triangles to make scenes that are more realistic than those covered in solid colors. Here are the basic steps for texturing a triangle.
This list of steps glosses over a few details that are described in the following sections.
Texture Coordinates
Due to a weird "feature" of the way WPF colors triangles, it seems to scale the texture coordinates that are actually used, so a program uses the entire width and height of the texture. If your triangles use texture coordinates that cover the entire range 0 to 1, then the texture isn't scaled (or it's scaled by a factor of 1) so everything is as you would expect. But suppose you have a single triangle in a mesh and its texture coordinates only span the range 0 ≤ U ≤ 0.5 and 0 ≤ V ≤ 0.5. In that case, WPF "helpfully" scales the coordinates so they use the texture's entire surface. Instead of using coordinates in the upper left part of the texture, the triangle uses the texture's whole surface. (I don't really know why it's doing this. I've messed with the ImageBrush's viewport parameters and haven't been able to find a reasonable solution. If you find one, please let me know.) One workaround is to make sure the triangles in the mesh cover the ranges 0 ≤ U ≤ 1 and 0 ≤ V ≤ 1. Another solution is to resize the texture image so it only includes the parts of the texture that you actually want to use.
The remaining two triangles each use a quarter of the texture. The bottom triangle uses the lower left quarter and the upper triangle uses the upper right quarter of the texture. You can see that the texture has not been scaled for those two triangles so they look as they should. (The second triangle from the left would look like the lower right triangle if the texture wasn't scaled for it.)
Using ImageBrushesCreating an ImageBrush should be trivial, but in WPF it's not. For the approach used by this example, start by adding the image file you want to use to the project. To do that, open the Project menu, select Add Existing Object, select the file, and click Add. Next select the image file in Solution Explorer. Set its "Build Action" property to Content and set its "Copy to Output Directory" to "Copy if newer." Now you can use code similar to the following to create the brush at run time.
ImageBrush colors_brush = new ImageBrush(); colors_brush.ImageSource = new BitmapImage(new Uri("Colors.png", UriKind.Relative)); After you create the brush, you can use it to make a material and apply it to the mesh as usual.
The ProgramThe program uses four methods to create its triangles. The following code shows the second method, which creates the second triangle from the left.
// Make a triangle that uses the lower left quarter of the texture. private void MakeMesh2(Model3DGroup model_group) { // Make a mesh to hold the surface. MeshGeometry3D mesh = new MeshGeometry3D(); // Set the triangle's points. mesh.Positions.Add(new Point3D(-1, 1, 0)); mesh.Positions.Add(new Point3D(-1, 0, 0)); mesh.Positions.Add(new Point3D(0, 0, 0)); // Set the points' texture coordinates. mesh.TextureCoordinates.Add(new Point(0, 0.5)); mesh.TextureCoordinates.Add(new Point(0, 1)); mesh.TextureCoordinates.Add(new Point(0.5, 1)); // Create the triangle. mesh.TriangleIndices.Add(0); mesh.TriangleIndices.Add(1); mesh.TriangleIndices.Add(2); // Make the surface's material using an image brush. ImageBrush colors_brush = new ImageBrush(); colors_brush.ImageSource = new BitmapImage(new Uri("Colors.png", UriKind.Relative)); DiffuseMaterial colors_material = new DiffuseMaterial(colors_brush); // Make the mesh's model. GeometryModel3D surface_model = new GeometryModel3D(mesh, colors_material); // Make the surface visible from both sides. surface_model.BackMaterial = colors_material; // Add the model to the model groups. model_group.Children.Add(surface_model); } If you look at the way the code sets the TextureCoordinates values, you'll see that this should make the triangle use only the lower left quarter of the texture. The other two methods are fairly similar. Download the example to see how they work. Now that you know how to apply textures to triangles, I'll post a few examples that use textures in more interesting ways. Download the example to experiment with it and to see additional details. |
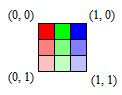 Texture coordinates are measured starting at the upper left corner of the texture image and increasing to the right and downward. The coordinate of the upper left corner is (0, 0), and the coordinate of the lower right corner is (1, 1) as shown in the picture on the right. The coordinates are usually referred to as U and V coordinates instead of X and Y coordinates.
 If you look at the picture at the top of this post, the triangle on the left uses the full extent of the texture shown on the right. The second triangle uses only the lower left quarter of the texture. WPF scales it so it uses the full texture.