Title: Place a notify icon in the system taskbar in C#

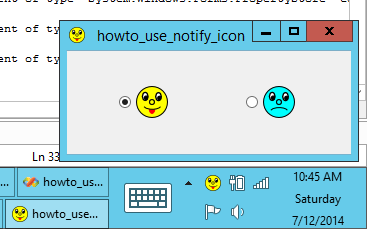
A program can use a notify icon to place a visual indication of what's happening in the notification area (aka the system tray), which by default is on the right end of the taskbar.
The NotifyIcon component makes this relatively easy. First place the component on your form. Set the component's Icon property to determine what icon it displays. Set its Text property to determine what it displays in its tooltip. You can also set its ContextMenu property to specify the ContextMenuStrip the component should display when you right-click it.
When you click the Happy radio button, the following code executes.
// Display the happy icon.
private void radHappy_Click(object sender, EventArgs e)
{
if (!radHappy.Checked) radHappy.Checked = true;
this.Icon = Properties.Resources.HappyIco;
NotifyIcon1.Icon = Properties.Resources.HappyIco;
NotifyIcon1.Text = "Happy";
}
First the code checks the Happy radio button if it is not already checked. To avoid duplicating code, the program uses this same event handler for the radio button's Click event and the context menu's Happy item's Click event. If the event handler is being executed by the context menu, this first line of code ensures that the program's Happy radio button is checked.
Next the code sets the form's Icon property to the Happy icon resource. It finishes by setting the NotifyIcon's Icon and Text properties.
The code that manages the Sad button works similarly.
User Interface Notes
In earlier versions of Windows, notify icons were always visible so they gave you an easy way to keep the user updated about the application's state. Unfortunately recent versions of Windows, such as Windows 8, has made this a lot less useful. By default, the notification area makes only a few icons visible and hides the rest in an overflow area that is only visible if you click the little expander arrow next to the notification area.
If you like, you can change that behavior. Start the program that displays the notify icon. While it is running, right-click the taskbar and select Customize. On the Toolbar tab, click the Customize button. On the Notification Area Icons dialog, find the application, change its Behaviors entry to "Show icon and notifications," and click OK. Now the icon will appear in the notification area.
This is difficult enough that it may not be worth the effort for programs that you will give to other people to run. Instead, you can use the program's icon to provide notification in the system taskbar. Simply change the program's icon and the change will appear. Unfortunately this doesn't let you associate a ContextMenu with the taskbar icon, but at least it makes notification easier.
Windows 8 has also changed the sizes of the icons in the system tray. Icons that contained images with sizes 16×16 and 32×32 used to be enough. Those icons now are scaled (at least for some Windows settings) and may look pretty ugly (as in this example).
You can call GetSystemMetrics(SM_CXSMICON) (or use LoadIconMetric with parameter LIM_SMALL) to find out what size the system expects. To be (relatively) safe, you could just provide 20×20 and 24×24 pixel versions, too.
Unfortunately Microsoft doesn't provide an icon editor in the less expensive versions of Visual Studio any more (such as the Express editions), so you'll need to use some other icon editor such as IcoFX, Greenfish, or InkScape/Gimp.
In one final twist, to display the notification area icons, Windows 8 seems to pick the 32×32 image from the icon and scale it down to 16×16 pixels (or whatever size it wants), even if the icon file contains a 16×16 version! That means if you create a nice icon file with the perfect size, Windows still scales down the wrong size and you get an ugly result.
So, to get the best result, use an icon file that contains only a 16×16 pixel image (or whatever size Windows wants). (You'll probably want to use other icon files with more image sizes for other things such as the form so Windows can display it properly in different views.)
Download the example to experiment with it and to see additional details.
|
![[C# Helper]](../banner260x75.png)

![[Beginning Database Design Solutions, Second Edition]](db2_79x100.png)
![[Beginning Database Design Solutions, Second Edition]](db2_79x100.png)