![[C# Helper]](../banner260x75.png)
|
|
 |
![[Beginning Database Design Solutions, Second Edition]](db2_79x100.png)
![[Beginning Software Engineering, Second Edition]](book_sw_eng2_79x100.png)
![[Essential Algorithms, Second Edition]](book_algs2e_79x100.png)
![[The Modern C# Challenge]](book_csharp_challenge_80x100.jpg)
![[WPF 3d, Three-Dimensional Graphics with WPF and C#]](book_wpf3d_80x100.png)
![[The C# Helper Top 100]](book_top100_80x100.png)
![[Interview Puzzles Dissected]](book_interview_puzzles_80x100.png)
![[C# 24-Hour Trainer]](book_csharp24hr_2e_79x100.jpg)
![[C# 5.0 Programmer's Reference]](book_csharp_prog_ref_80x100.png)
![[MCSD Certification Toolkit (Exam 70-483): Programming in C#]](book_c_cert_80x100.jpg)

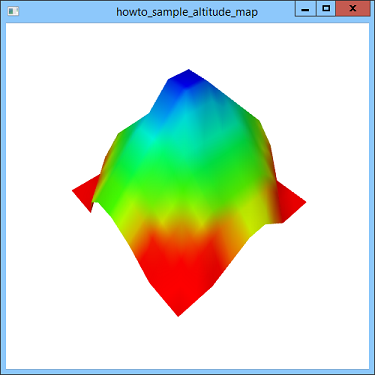
Title: Draw a 3D surface from a set of data points with an altitude map using WPF and C#
This example uses C# and XAML to draw a 3D surface from a set of data points that's overlaid with a shaded altitude map. The example Draw a 3D surface overlaid with a shaded altitude map using WPF and C# explains how to draw a 3D surface generated by a function. This example generates its surface from a set of data points stored in an array. The previous example also stores its data points in an array of values, so this version only needs a few changes. The following method defines the data.
// Make the data. private double[,] MakeData() { double[,] values = { {0,0,0,1,2,2,1,0,0,0}, {0,0,2,3,3,3,3,2,0,0}, {0,2,3,4,4,4,4,3,2,0}, {2,3,4,5,5,5,5,4,3,2}, {3,4,5,6,7,7,6,5,4,3}, {3,4,5,6,7,7,6,5,4,3}, {2,3,4,5,5,5,5,4,3,2}, {0,2,3,4,4,4,4,3,2,0}, {0,0,2,3,3,3,3,2,0,0}, {0,0,0,1,2,2,1,0,0,0} }; xmin = 0; xmax = values.GetUpperBound(0); dx = 1; zmin = 0; zmax = values.GetUpperBound(1); dz = 1; texture_xscale = (xmax - xmin); texture_zscale = (zmax - zmin); return values; } The code creates a values array, sets a few global parameters, and then returns the values. The CreateAltitudeMap method is similar to the previous version except it takes its values as an array passed into it as a parameter instead of using a function to generate the values. See the previous example for information about that method. The last significant change is to the DefineModel method shown in the following code.
// Add the model to the Model3DGroup. private void DefineModel(Model3DGroup model_group, double[,] values) { // Make a mesh to hold the surface. MeshGeometry3D mesh = new MeshGeometry3D(); // Make the surface's points and triangles. float offset_x = xmax / 2f; float offset_z = zmax / 2f; for (int x = xmin; x <= xmax - dx; x += dx) { for (int z = zmin; z <= zmax - dz; z += dx) { // Make points at the corners of the surface // over (x, z) - (x + dx, z + dz). Point3D p00 = new Point3D( x - offset_x, values[x, z], z - offset_z); Point3D p10 = new Point3D( x - offset_x + dx, values[x + dx, z], z - offset_z); Point3D p01 = new Point3D( x - offset_x, values[x, z + dz], z - offset_z + dz); Point3D p11 = new Point3D( x - offset_x + dx, values[x + dx, z + dz], z - offset_z + dz); // Add the triangles. AddTriangle(mesh, p00, p01, p11); AddTriangle(mesh, p00, p11, p10); } } Console.WriteLine(mesh.Positions.Count + " points"); Console.WriteLine(mesh.TriangleIndices.Count / 3 + " triangles"); Console.WriteLine(); // Make the surface's material using an image brush. ImageBrush texture_brush = new ImageBrush(); texture_brush.ImageSource = new BitmapImage(new Uri("Texture.png", UriKind.Relative)); DiffuseMaterial surface_material = new DiffuseMaterial(texture_brush); // Make the mesh's model. GeometryModel3D surface_model = new GeometryModel3D(mesh, surface_material); // Make the surface visible from both sides. surface_model.BackMaterial = surface_material; // Add the model to the model groups. model_group.Children.Add(surface_model); } This method creates triangles representing the surface to draw. This version is the same as the previous one with two changes. First, the previous version uses a function F to generate the Y coordinates for the points inside the nested for loops. This version takes its values from the values array. Second, this version subtracts the values offset_x and offset_z from the points' X and Z coordinates to center the surface at the origin in the X and Z directions. The rest of the program is more or less the same as the previous version. Download the example to experiment with it and to see additional details. |