![[C# Helper]](../banner260x75.png)
|
|
 |
![[Beginning Database Design Solutions, Second Edition]](db2_79x100.png)
![[Beginning Software Engineering, Second Edition]](book_sw_eng2_79x100.png)
![[Essential Algorithms, Second Edition]](book_algs2e_79x100.png)
![[The Modern C# Challenge]](book_csharp_challenge_80x100.jpg)
![[WPF 3d, Three-Dimensional Graphics with WPF and C#]](book_wpf3d_80x100.png)
![[The C# Helper Top 100]](book_top100_80x100.png)
![[Interview Puzzles Dissected]](book_interview_puzzles_80x100.png)
![[C# 24-Hour Trainer]](book_csharp24hr_2e_79x100.jpg)
![[C# 5.0 Programmer's Reference]](book_csharp_prog_ref_80x100.png)
![[MCSD Certification Toolkit (Exam 70-483): Programming in C#]](book_c_cert_80x100.jpg)

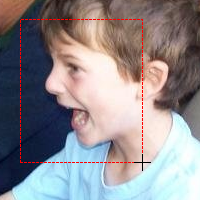
Title: Use a rubber band box to let the user select an area in a picture in C#
The following shows the program's startup code.
private Bitmap m_OriginalImage = null; private int X0, Y0, X1, Y1; private bool SelectingArea = false; private Bitmap SelectedImage = null; private Graphics SelectedGraphics = null; // Save the original image. private void Form1_Load(object sender, EventArgs e) { m_OriginalImage = new Bitmap(picImage.Image); this.KeyPreview = true; } The variables X0, Y0, X1, and Y1 store the mouse coordinates as you select a region. The form's Load event handler saves a copy of the picImage PictureBox's image. It also sets the form's KeyPreview property to true so the program can tell when you press Esc to cancel the area selection. The program uses three event handlers to display the rubber band box: MouseDown, MouseMove, and MouseUp. When you press the mouse down, the following MouseDown event handler starts selecting an area.
// Start selecting an area. private void picImage_MouseDown(object sender, MouseEventArgs e) { // Save the starting point. SelectingArea = true; X0 = e.X; Y0 = e.Y; // Make the selected image. SelectedImage = new Bitmap(m_OriginalImage); SelectedGraphics = Graphics.FromImage(SelectedImage); picImage.Image = SelectedImage; } This code sets SelectingArea to true so the program knows it is selecting an area. It then saves the mouse's current coordinates and makes a new copy of the PictureBox's original image. (As you move the mouse, it will draw the rubber band box on this image.) The code creates a Graphics object associated with the image and makes the PictureBox display it. When the user moves the mouse over the picture, the following MouseMove event handler continues selecting the area.
// Continue selecting an area. private void picImage_MouseMove(object sender, MouseEventArgs e) { // Do nothing if we're not selecting an area. if (!SelectingArea) return; // Generate the new image with the selection rectangle. X1 = e.X; Y1 = e.Y; // Copy the original image. SelectedGraphics.DrawImage(m_OriginalImage, 0, 0); // Draw the selection rectangle. using (Pen select_pen = new Pen(Color.Red)) { select_pen.DashStyle = DashStyle.Dash; Rectangle rect = MakeRectangle(X0, Y0, X1, Y1); SelectedGraphics.DrawRectangle(select_pen, rect); } picImage.Refresh(); } First, if the program isn't currently selecting an area, the event handler exits. Next the code saves the mouse's new location. It copies the original image onto the SelectedImage to erase the previous rubber band box. It then draws a new rubber band box with a red dashed pen. The Rectangle structure's constructor cannot handle negative widths and heights, so you can't simply create the Rectangle to draw as in the following code.
// This doesn't work. Rectangle rect = new Rectangle(X0, Y0, X1 - X0, Y1 - Y0); To avoid this issue, the MouseMove event handler calls the following MakeRectangle method to create the Rectangle.
// Return a Rectangle with these points as corners. private Rectangle MakeRectangle(int x0, int y0, int x1, int y1) { return new Rectangle( Math.Min(x0, x1), Math.Min(y0, y1), Math.Abs(x0 - x1), Math.Abs(y0 - y1)); } When you release the mouse, the following MouseUp event handler finishes selecting the area.
// Finish selecting the area. private void picImage_MouseUp(object sender, MouseEventArgs e) { if (!SelectingArea) return; SelectingArea = false; SelectedImage = null; SelectedGraphics = null; picImage.Image = m_OriginalImage; picImage.Refresh(); // Convert the points into a Rectangle. Rectangle rect = MakeRectangle(X0, Y0, X1, Y1); if ((rect.Width > 0) && (rect.Height > 0)) { // Display the Rectangle. MessageBox.Show(rect.ToString()); } } This code sets SelectingArea to false so future mouse movement is ignored. The code restores the PictureBox's original image and refreshes it. The event handler finishes by converting the selected points into a Rectangle and displaying it's properties. (In my next blog entry, I'll explain how to do something more interesting with the selected area: copy that part of the image to the clipboard.) The final piece of code is the following KeyPress event handler.
// If the user presses Escape, cancel. private void Form1_KeyPress(object sender, KeyPressEventArgs e) { if (e.KeyChar == 27) { if (!SelectingArea) return; SelectingArea = false; // Stop selecting. SelectedImage = null; SelectedGraphics = null; picImage.Image = m_OriginalImage; picImage.Refresh(); } } If you press Esc while selecting an area, this code cancels the selection. Download the example to experiment with it and to see additional details. |