![[C# Helper]](../banner260x75.png)
|
|
 |
![[Beginning Database Design Solutions, Second Edition]](db2_79x100.png)
![[Beginning Software Engineering, Second Edition]](book_sw_eng2_79x100.png)
![[Essential Algorithms, Second Edition]](book_algs2e_79x100.png)
![[The Modern C# Challenge]](book_csharp_challenge_80x100.jpg)
![[WPF 3d, Three-Dimensional Graphics with WPF and C#]](book_wpf3d_80x100.png)
![[The C# Helper Top 100]](book_top100_80x100.png)
![[Interview Puzzles Dissected]](book_interview_puzzles_80x100.png)
![[C# 24-Hour Trainer]](book_csharp24hr_2e_79x100.jpg)
![[C# 5.0 Programmer's Reference]](book_csharp_prog_ref_80x100.png)
![[MCSD Certification Toolkit (Exam 70-483): Programming in C#]](book_c_cert_80x100.jpg)

Title: Interactively rotate images in C#
The example Rotate images C# explains how you can rotate an image by a angle specified in a TextBox. This example lets you click and drag around the image's center to specify the angle of rotation. The following code shows how the program starts the process when you press the mouse down on the image.
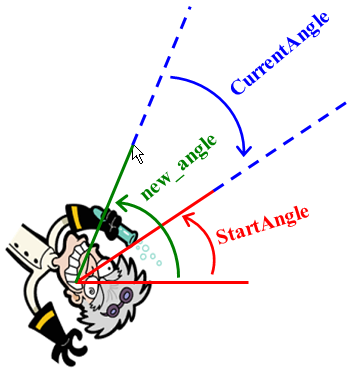
// Let the user click and drag to rotate. private float StartAngle; private bool DragInProgress = false; private void picRotated_MouseDown( object sender, MouseEventArgs e) { // Do nothing if there's no image loaded. if (OriginalBitmap == null) return; DragInProgress = true; // Get the initial angle from horizontal to the // vector between the center and the drag start point. float dx = e.X - ImageCenter.X; float dy = e.Y - ImageCenter.Y; StartAngle = (float)Math.Atan2(dy, dx); }
If no image is loaded, the MouseDown event handler simply exits. Otherwise it sets DragInProgress to true so it remembers that you are dragging. It then calculates the angle between the center of the image and the mouse's position and saves it in the variable StartAngle. (See the picture on the right.) When you move the mouse, the following MouseMove event handler executes.
private void picRotated_MouseMove( object sender, MouseEventArgs e) { // Do nothing if there's no drag in progress. if (!DragInProgress) return; // Get the angle from horizontal to the // vector between the center and the current point. float dx = e.X - ImageCenter.X; float dy = e.Y - ImageCenter.Y; float new_angle = (float)Math.Atan2(dy, dx); // Calculate the change in angle. CurrentAngle = new_angle - StartAngle; // Convert to degrees. CurrentAngle *= 180 / (float)Math.PI; // Add to the previous total angle rotated. CurrentAngle += TotalAngle; txtAngle.Text = CurrentAngle.ToString("0.00") + "�"; // Rotate the original image to make the result bitmap. RotatedBitmap = RotateBitmap(OriginalBitmap, CurrentAngle); // Display the result. picRotated.Image = RotatedBitmap; picRotated.Refresh(); }
If no drag is in progress, the event handler exits. Otherwise it calculates the angle from current mouse position to the center of the image and saves it in variable new_angle. It uses that value to calculate the current angle. This is the amount by which you have dragged the mouse (in degrees) and therefore the amount by which the program should rotate the image. (See the picture on the right.) The program converts the current angle from degrees into radians. It then adds TotalAngle to the current angle. The value TotalAngle is the angle by which the image was rotated during a previous drag and drop. When the image is first loaded, this value is 0. After you finish dragging, this value records the current angle of rotation. That way when you drag again, the rotation starts with the previous rotation. The result is that you start rotating the image where you left off instead of starting the rotation over from scratch. (The result is intuitive but the calculation isn't. Comment out the code that adds TotalAngle to CurrentAngle to see what it looks like.) Next the code calls the RotateBitmap method to rotate the bitmap. Finally, it displays the result. This program uses a version of RotateBitmap that is slightly different (and simpler) than the version used by the previous example. The previous version of the RotateBitmap method returned an image that was large enough to hold the entire rotated image. Unfortunately as you rotate an image, the required size changes. This example lets you rotate the image interactively, so the result resizes itself many times as you drag the mouse. The result is annoying and non-intuitive. This example's version of RotateBitmap returns a bitmap with the same size as the original image. That means parts of the rotated image may be chopped off, but it produces a much nicer result. The following code shows the new version.
// Return a bitmap rotated around its center. private Bitmap RotateBitmap(Bitmap bm, float angle) { // Make a bitmap to hold the rotated result. Bitmap result = new Bitmap(bm.Width, bm.Height); // Create the real rotation transformation. Matrix rotate_at_center = new Matrix(); rotate_at_center.RotateAt(angle, new PointF(bm.Width / 2f, bm.Height / 2f)); // Draw the image onto the new bitmap rotated. using (Graphics gr = Graphics.FromImage(result)) { // Use smooth image interpolation. gr.InterpolationMode = InterpolationMode.High; // Clear with the color in the image's upper left corner. gr.Clear(OriginalBitmap.GetPixel(0, 0)); //// For debugging. (Easier to see the background.) //gr.Clear(Color.LightBlue); // Set up the transformation to rotate. gr.Transform = rotate_at_center; // Draw the image centered on the bitmap. gr.DrawImage(bm, 0, 0); } // Return the result bitmap. return result; } This version of the RotateBitmap method creates a result bitmap with the same size as the original and creates a transformation matrix to rotate around the image's center. It then makes a Graphics object associated with the result image and draws the image. The following code shows the program's MouseUp event handler.
private void picRotated_MouseUp(object sender, MouseEventArgs e) { DragInProgress = false; // Save the new total angle of rotation. TotalAngle = CurrentAngle; } This code sets DragInProgress to false to end the current drag. It then saves the current angle of rotation in variable TotalAngle so the next rotation starts from there. Download the example to experiment with it and to see additional details. |
![[Interactively rotate images in C#]](howto_rotate_image_interactively.png)