![[C# Helper]](../banner260x75.png)
|
|
 |
![[Beginning Database Design Solutions, Second Edition]](db2_79x100.png)
![[Beginning Software Engineering, Second Edition]](book_sw_eng2_79x100.png)
![[Essential Algorithms, Second Edition]](book_algs2e_79x100.png)
![[The Modern C# Challenge]](book_csharp_challenge_80x100.jpg)
![[WPF 3d, Three-Dimensional Graphics with WPF and C#]](book_wpf3d_80x100.png)
![[The C# Helper Top 100]](book_top100_80x100.png)
![[Interview Puzzles Dissected]](book_interview_puzzles_80x100.png)
![[C# 24-Hour Trainer]](book_csharp24hr_2e_79x100.jpg)
![[C# 5.0 Programmer's Reference]](book_csharp_prog_ref_80x100.png)
![[MCSD Certification Toolkit (Exam 70-483): Programming in C#]](book_c_cert_80x100.jpg)

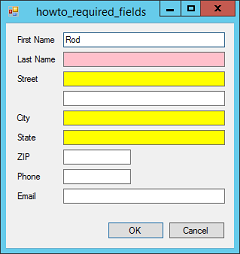
Title: Make an extender provider that validates required TextBoxes in C#
An extender provider provides properties and services for other controls and components on a form. For example, the ToolTip component is an extender provider. When you add one to a form, the other controls on the form get a new "ToolTip on ToolTip1" property that is provided by the ToolTip object. Extender providers are an under-used feature of C#, probably because of the strange way you implement them. You can build your own to do all sorts of things. For example, an extender provider can store information for controls or catch control events and take action when they occur. This example shows how an extender provider can validate a TextBox's value and, if it is blank, give the TextBox a distinctive background color so the user can see that a required value is missing. It's a fairly long example that also demonstrates nullable types. The basic steps for building an ExtenderProvider are:
This example uses the following code to implement its MissingBackColor property.
// The list of our clients and their colors.
private List The extender provider uses a List to store its client TextBoxes. It uses two Dictionary objects to store the colors to use when the clients hold blank values or non-blank values. The GetMissingBackColor and SetMissingBackColor methods implement the MissingBackColor property for the clients. GetMissingBackColor simply returns the value stored in the MissingColors Dictionary, if the client has a value in the dictionary. SetMissingBackColor checks whether the new value is null indicating that the TextBox should not be required. If the value is not null, the code saves the control's desired missing color and its current background color. If the client isn't already in the client list, the code adds it and registers the Client_Validating event handler to catch the client's Validating event. (Note that the program could catch the control's TextChanged event instead of the Validating event to make it update the control's BackColor whenever its value changed. You can decide which method is more appropriate.) If the new missing color is null, the code removes the client from the client list and removes the client's colors from the color dictionaries. The following code shows how the extender provider validates its clients.
// Display the appropriate BackColor. private void Client_Validating(object sender, CancelEventArgs e) { ValidateClient(sender as TextBox); } private void ValidateClient(TextBox client) { client.BackColor = CorrectColor(client); } // Return the correct color for a TextBox. private Color CorrectColor(TextBox client) { if (client.Text.Length < 1) return MissingColors[client]; else return PresentColors[client]; } The Client_Validating event handler calls the ValidateClient method. That method sets the control's BackColor property equal to the result of the CorrectColor method. CorrectColor examines the client's text and returns the appropriate color. The extender provider also provides a couple of methods that the main program can use.
// Return the first required field that is blank. public TextBox FirstMissingField() { // Check all of the fields. CheckAllFields(); // See if any clients are blank. foreach (TextBox client in Clients) if (client.Text.Length == 0) return client; return null; } // Check all clients now. This is useful // for initializing background colors. public void CheckAllFields() { foreach (TextBox client in Clients) ValidateClient(client); } The FirstMissingField method calls CheckAllFields to check all of the registered clients. It then returns the first client that holds a blank value. The CheckAllFields method loops through all of the registered clients and calls ValidateClient for each. The main program acts as if it were a dialog. If you click the OK button, it uses the following code to demonstrate the FirstMissingField method.
// True if we should check required fields. // Normally this is false so we don't check fields if // the user closes the form by pressinng Alt-F4, etc. private bool CheckRequiredFields = false; // Check that required fields are non-blank. private void btnOk_Click(object sender, EventArgs e) { CheckRequiredFields = true; this.Close(); } // Just close. private void btnCancel_Click(object sender, EventArgs e) { this.Close(); } // If we should check required fields, do so. private void Form1_FormClosing(object sender, FormClosingEventArgs e) { if (CheckRequiredFields) { TextBox missing_field = reqChecker.FirstMissingField(); if (missing_field != null) { MessageBox.Show("Please enter all required fields.", "Required Value Missing", MessageBoxButtons.OK, MessageBoxIcon.Exclamation); missing_field.Focus(); e.Cancel = true; } // Next time we try to close, don't check // (unless the user clicks OK again). CheckRequiredFields = false; } } The CheckRequiredFields value indicates whether the form should check its required fields before closing. When you click the OK button, the program sets CheckRequiredFields to true and the closes the form. If you click the Cancel button, the program just closes the form. The form's Closing event handler checks the CheckRequiredFields value. If that value is true, the code calls teh extender provider's FirstMissingField method. If the method returns a client, the program displays an error message, sets focus to the returned client, and sets e.Cancel = true to prevent the form from closing. In any case, the event handler sets CheckRequiredFields to false so the form will close if you click the Cancel button, press the X in the form's upper right corner, press Alt+F4, or use the form's system menu to close the form. Download the example to experiment with it and to see additional details. |