![[C# Helper]](../banner260x75.png)
|
|
 |
![[Beginning Database Design Solutions, Second Edition]](db2_79x100.png)
![[Beginning Software Engineering, Second Edition]](book_sw_eng2_79x100.png)
![[Essential Algorithms, Second Edition]](book_algs2e_79x100.png)
![[The Modern C# Challenge]](book_csharp_challenge_80x100.jpg)
![[WPF 3d, Three-Dimensional Graphics with WPF and C#]](book_wpf3d_80x100.png)
![[The C# Helper Top 100]](book_top100_80x100.png)
![[Interview Puzzles Dissected]](book_interview_puzzles_80x100.png)
![[C# 24-Hour Trainer]](book_csharp24hr_2e_79x100.jpg)
![[C# 5.0 Programmer's Reference]](book_csharp_prog_ref_80x100.png)
![[MCSD Certification Toolkit (Exam 70-483): Programming in C#]](book_c_cert_80x100.jpg)

Title: Draw "marching ants" dashed lines in C#
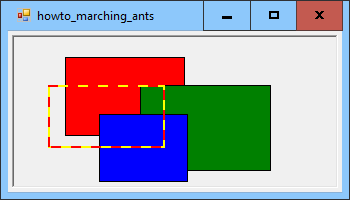
The example Draw dashed lines that are visible on any background in C# shows how to draw lines that are visible above any backgrounds. If the background is very cluttered, however, it may still be somewhat hard to see the lines. This example shows another approach. It draws two-colored dashed lines where the dashes move like a line of marching ants. The basic idea is simple. The program uses a Pen that has a dash pattern. When a Timer fires, the program sets the Pen object's DashOffset to a new value and redraws the dashed lines. The DashOffset value gives the distance from the beginning of the line to the start of the first dash. All of the later dashes follow the first one so they are also offset. The DashOffset value increases over time making it look like the dashes are moving.
The following code shows the variables that the program uses to manage its rectangles.
// Previously selected rectangles. private List<Rectangle> Rectangles = new List<Rectangle>(); // The rectangle we are selecting. private Rectangle NewRectangle; // Variables used to select a new rectangle. private int StartX, StartY, EndX, EndY; private bool SelectingRectangle = false; The Rectangles list holds Rectangle objects that have already been drawn. The program uses the other variables to let the user select a new Rectangle by clicking and dragging. The following code shows how the program lets the user select a new rectangle.
// Start selecting a rectangle. private void picCanvas_MouseDown(object sender, MouseEventArgs e) { // Save the current point. StartX = e.X; StartY = e.Y; EndX = e.X; EndY = e.Y; // Make a new selection rectangle. NewRectangle = new Rectangle( Math.Min(StartX, EndX), Math.Min(StartY, EndY), Math.Abs(StartX - EndX), Math.Abs(StartY - EndY)); // Start marching. SelectingRectangle = true; tmrMarch.Enabled = true; } // Continue selecting a rectangle. private void picCanvas_MouseMove(object sender, MouseEventArgs e) { if (!SelectingRectangle) return; // Save the current point. EndX = e.X; EndY = e.Y; // Make a new selection rectangle. NewRectangle = new Rectangle( Math.Min(StartX, EndX), Math.Min(StartY, EndY), Math.Abs(StartX - EndX), Math.Abs(StartY - EndY)); // Redraw. Refresh(); } // Finish selecting a rectangle. private void picCanvas_MouseUp(object sender, MouseEventArgs e) { if (!SelectingRectangle) return; SelectingRectangle = false; tmrMarch.Enabled = false; if ((StartX == EndX) || (StartY == EndY)) return; // Save the newly selected rectangle. Rectangles.Add(new Rectangle( Math.Min(StartX, EndX), Math.Min(StartY, EndY), Math.Abs(StartX - EndX), Math.Abs(StartY - EndY))); // Redraw. Refresh(); } When the user presses the mouse down, the MouseDown event handler records the mouse's position, sets SelectingRectangle to true, and enables the Timer named tmrMarch. When the mouse moves, the MouseMove event handler records the mouse's new position, updates the NewRectangle variable to represent the newly selected rectangle, and refreshes the form to make the program execute the Paint event handler described shortly. When the user releases the mouse, the MouseUp event handler adds the newly selected rectangle to the Rectangles list and refresh the form. The following code shows the tmrMarch Timer component's Tick event handler.
// Redraw. private void tmrMarch_Tick(object sender, EventArgs e) { Refresh(); } This event handler simply refreshes the form to make it execute the following Paint event handler.
// Parameters for drawing the dashed rectangle. private int Offset = 0; private int OffsetDelta = 2; private float[] DashPattern = { 5, 5 }; // Draw the rectangles. private void picCanvas_Paint(object sender, PaintEventArgs e) { Offset += OffsetDelta; // Draw previously selected rectangles. for (int i = 0; i < Rectangles.Count; i++) { e.Graphics.FillRectangle( RectangleBrushes[i % RectangleBrushes.Length], Rectangles[i]); e.Graphics.DrawRectangle(Pens.Black, Rectangles[i]); } // Draw the new rectangle. if (SelectingRectangle) { e.Graphics.DrawRectangle(NewRectangle, Color.Yellow, Color.Red, 2f, Offset, DashPattern); } } This is where the most interesting code is. The variable Offset holds the dashed line's current DashOffset value. The value OffsetDelta gives the amount by which Offset is adjusted every time the Paint event handler executes. You can change OffsetDelta and the Timer component's Interval property (I have it set to 250 milliseconds or 1/4 second) to change the speed of the ants. The DashPattern array determines the dash pattern used by the dashed lines. In this example, the pattern draws 5 units, skips 5 units, and then repeats. The Paint event handler first increaes Offset by the value OffsetDelta. It then draws the previously selected rectangles. It uses the brushes in the RectangleBrushes array to give the rectangles colors. If the user is currently selecting a rectangle, the program then calls the following DrawRectangle extension method to draw a rectangle with two-color dashed lines. (As you can probably guess, I made the extension method to make drawing rectangles with two-color dashed lines a bit easier.)
// Draw a two-color dashed rectangle. public static void DrawRectangle(this Graphics gr, Rectangle rect, Color color1, Color color2, float thickness, float offset, float[] dash_pattern) { using (Pen pen = new Pen(color1, thickness)) { gr.DrawRectangle(pen, rect); pen.DashPattern = dash_pattern; pen.DashOffset = offset; pen.Color = color2; gr.DrawRectangle(pen, rect); } } This method begins by drawing the rectangle in its first color parameter. Next it creates a Pen, gives if the DashPattern defined by its dash_pattern parameter, and sets its DashOffset. It then draws the new rectangle over the old one, this time using the dashed pen. Download the example to experiment with it and to see additional details. |