![[C# Helper]](../banner260x75.png)
|
|
 |
![[Beginning Database Design Solutions, Second Edition]](db2_79x100.png)
![[Beginning Software Engineering, Second Edition]](book_sw_eng2_79x100.png)
![[Essential Algorithms, Second Edition]](book_algs2e_79x100.png)
![[The Modern C# Challenge]](book_csharp_challenge_80x100.jpg)
![[WPF 3d, Three-Dimensional Graphics with WPF and C#]](book_wpf3d_80x100.png)
![[The C# Helper Top 100]](book_top100_80x100.png)
![[Interview Puzzles Dissected]](book_interview_puzzles_80x100.png)
![[C# 24-Hour Trainer]](book_csharp24hr_2e_79x100.jpg)
![[C# 5.0 Programmer's Reference]](book_csharp_prog_ref_80x100.png)
![[MCSD Certification Toolkit (Exam 70-483): Programming in C#]](book_c_cert_80x100.jpg)

Title: Map points between coordinate systems in C#
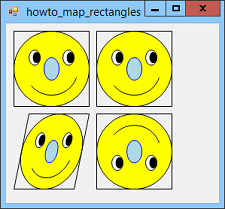
This example shows how you can easily map points between different coordinate systems. The Graphics object provides transformations that let you scale, translate, rotate, skew, and otherwise transform graphics as you draw them. One important use of these transformations is to let you draw graphics in a coordinate system that is convenient for your data and then have them appear where you need them on the form. For example, this program uses a DrawSmiley method to draw a smiley face in the area (-1, -1) - (1, 1) and then uses transformations to map that area to four different places on the form. For drawing applications such as this one, it's often easier to draw objects centered at the origin and then move the result. For other applications such as mapping, charting, and graphing programs, it's often easier to draw in some other coordinate space (such as longitude/latitude or years/sales) and then transform the result to the place where you want the drawing to appear. See the code to learn how the DrawSmiley method works. It's mostly straightforward and uses Graphics methods such as FillEllipse, DrawEllipse, and DrawArc to draw the smiley face. One non-obvious aspect of DrawSmiley is that transformed lines are drawn transformed. For example, suppose a program draws smiley faces scaled by a factor of 50. A predefined pen such as Pens.Black normally has a thickness of 1, so after it is scaled it will be 50 pixels wide and the result is a big black blob. Scaled pens can be interesting, particularly if you scale by different amounts vertically and horizontally, but it ruins many drawings including as this one. The solution is to make a custom pen with thickness 0. The special value 0 makes the program draw the line 1 pixel wide no matter how it is scaled. See the code for the rest of the DrawSmiley method's details. The more important part of this example is how it builds the transformations to map the smiley face onto the form. There are two basic approaches to defining the transformation that you want to use. First, you can use Graphics class methods such as ResetTransform, ScaleTransform, and RotateTransform to build the transformation one step at a time. The second approach is to make a Matrix object representing the transformation. Internally the Graphics class uses Matrix objects to represent a combination of transformations anyway, so this approach just skips the steps of building the Matrix by calling the ScaleTransform, RotateTransform, and other methods, and builds the Matrix directly. This would be hard except the Matrix class provides a very useful constructor that lets you map a rectangle to a parallelogram. In this example, the code maps the rectangle (-1, -1) - (1, 1) to a parallelogram on the form. The Matrix class's constructor generates the appropriate Matrix object to scale and translate the rectangle appropriately. The following code shows how the program demonstrates both of these methods.
// Draw some smiley faces in different places. private void Form1_Paint(object sender, PaintEventArgs e) { // Draw smoothly. e.Graphics.SmoothingMode = SmoothingMode.AntiAlias; // ********** // Method 1: Building the transformation from simple ones. // In the area (10, 10) - (110, 110). e.Graphics.ResetTransform(); // Scale by a factor of 50. e.Graphics.ScaleTransform(50, 50); // Translate to position correctly. e.Graphics.TranslateTransform(60, 60, MatrixOrder.Append); // Draw. DrawSmiley(e.Graphics); // ********** // Method 2: Mapping a rectangle to a parallelogram. // In the area (120, 10) - (220, 110). RectangleF from_rect = new RectangleF(-1, -1, 2, 2); PointF[] to_points = { new PointF(120, 10), // Upper left. new PointF(220, 10), // Upper right. new PointF(120, 110), // Lower left. }; Matrix map_matrix = new Matrix(from_rect, to_points); e.Graphics.Transform = map_matrix; // Draw. DrawSmiley(e.Graphics); // ********** // Method 2b: Using a skewed parallelogram. from_rect = new RectangleF(-1, -1, 2, 2); to_points = new PointF[] { new PointF(30, 120), // Upper left. new PointF(110, 120), // Upper right. new PointF(10, 220), // Lower left. }; map_matrix = new Matrix(from_rect, to_points); e.Graphics.Transform = map_matrix; // Draw. DrawSmiley(e.Graphics); // ********** // Method 2c: Using an inverted parallelogram. from_rect = new RectangleF(-1, -1, 2, 2); to_points = new PointF[] { new PointF(120, 220), // Upper left. new PointF(220, 220), // Upper right. new PointF(120, 120), // Lower left. }; map_matrix = new Matrix(from_rect, to_points); e.Graphics.Transform = map_matrix; // Draw. DrawSmiley(e.Graphics); } The code starts with the first method: using Graphics methods. It resets the Graphics object's transformation to clear out any previous transformations. (This isn't necessary in this example because no transformation is yet defined, but in general you should be careful not to leave old transformations in effect after they are no longer needed.) Next the code uses the ScaleTransform method to scale the drawing by a factor of 50 horizontally and vertically. It then uses TranslateTransform to translate the scaled result 60 pixels to the right and 60 pixels down. Notice the final Append parameter. This makes the Graphics object apply the translation after the scaling. For some crazy reason, the default behavior is to prepend new transformations before existing ones, so transformations you add later are performed earlier. I have no clue why Microsoft made that the default, but this is how you work around that behavior. After building the transformations, the code simply calls DrawSmiley and the drawing is automatically scaled and translated to the desired position. Next the code demonstrates the second approach: building a Matrix. It creates a RectangleF representing the area in the drawing coordinates (often called the "world coordinates") where the smiley will be drawn. It then creates an array of three PointF structures indicating where on the Graphics object the rectangle should be mapped. This array defines the upper left, upper right, and lower left corners of the parallelogram in that order and the Matrix constructor figures out where the fourth corner should be implicitly. (It would be more flexible if you could map a parallelogram to a parallelogram instead of a rectangle to a parallelogram. In fact, it would be even better if you could map an arbitrary quadrilateral to another quadrilateral. But that's not the way it works.) The program uses the source rectangle and destination parallelogram to create a Matrix object and sets the Graphics object's Transform property to that object. That defines the whole transformation. It replaces any previous transformation so you don't need to use ResetTransform. The code then draws the smiley face again and it is mapped to the new destination. Next the code uses the second method again to draw a smiley face into a parallelogram that is not rectangular. The code finishes by drawing with a parallelogram that has "upper" and "lower" corner with Y values switched so the parallelogram is upside-down. The result is an inverted smiley face. This technique is particularly useful when you are drawing something like a graph where the data's Y coordinates increase upwards but the form's coordinates increase downward. Often the second method (creating a Matrix) is easier if you are performing a simple mapping such as the ones used here. Creating a transformation in stages is often more useful when you need to use a very complex transformation. For example, it's often easier to use the RotateTransform method than to calculate the corners of a rotated parallelogram yourself. Download the example to experiment with it and to see additional details. |