![[C# Helper]](../banner260x75.png)
|
|
 |
![[Beginning Database Design Solutions, Second Edition]](db2_79x100.png)
![[Beginning Software Engineering, Second Edition]](book_sw_eng2_79x100.png)
![[Essential Algorithms, Second Edition]](book_algs2e_79x100.png)
![[The Modern C# Challenge]](book_csharp_challenge_80x100.jpg)
![[WPF 3d, Three-Dimensional Graphics with WPF and C#]](book_wpf3d_80x100.png)
![[The C# Helper Top 100]](book_top100_80x100.png)
![[Interview Puzzles Dissected]](book_interview_puzzles_80x100.png)
![[C# 24-Hour Trainer]](book_csharp24hr_2e_79x100.jpg)
![[C# 5.0 Programmer's Reference]](book_csharp_prog_ref_80x100.png)
![[MCSD Certification Toolkit (Exam 70-483): Programming in C#]](book_c_cert_80x100.jpg)

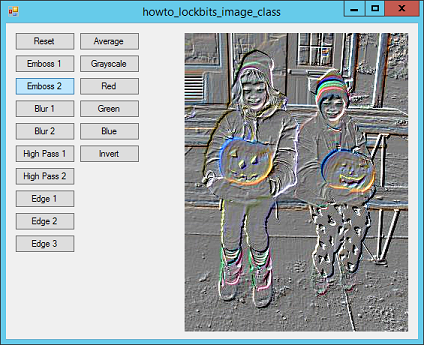
Title: Use image filters to perform edge detection, smoothing, embossing, and more in C#
Image filters let you perform operations on the pixel in an image. This is a fairly large example so you may want to spend some time walking through the code. In one kind of image filter, you have an array of values called the filter's kernel. For each pixel in the image, you center the kernel over that pixel. You then multiply the value of each pixel under the kernel by the corresponding kernel value. You add them up, divide by a "weight" value, and optionally add an offset to make the result look nicer. (For example, embossing filters tend to make the result very dark. You can add an offset of 127 to move the result to a mostly neutral value.) The result of those calculations gives you the new value for the center pixel. To handle color, simply treat the red, green, and blue color components separately. This example demonstrates several filters. The program is based on the example Use the Bitmap32 class to manipulate image pixels very quickly in C#. That example shows how to build a Bitmap32 class to manipulate bitmaps quickly. This example adds a few things to the Bitmap32 class. First, it adds a public Filter class to represent a filter. The following code shows the class's fields.
// A public class to represent filters. public class Filter { public float[,] Kernel; public float Weight, Offset; // Set the filter's weight equal to the sum // of the kernel's values. public void Normalize() ... // Set the value of the center kernel coefficient // so the kernel has a zero total. public void ZeroKernel() ... } The Filter class provides two methods that are useful for building certain kinds of kernels: Normalize and ZeroKernel. The Normalize method adds up the kernel values and sets the filter's weight equal to the total. The ZeroKernel method sets the kernel's center entry so the total of all of the kernel's values add up to 0. These methods are straightforward so they're not shown here. Download the example to see the details. The biggest addition to the Bitmap32 class is the ApplyFilter method shown in the following code.
// Apply a filter to the image. public Bitmap32 ApplyFilter(Filter filter, bool lock_result) { // Make a copy of this Bitmap32. Bitmap32 result = this.Clone(); // Lock both bitmaps. bool was_locked = this.IsLocked; this.LockBitmap(); result.LockBitmap(); // Apply the filter. int xoffset = -(int)(filter.Kernel.GetUpperBound(1) / 2); int yoffset = -(int)(filter.Kernel.GetUpperBound(0) / 2); int xmin = -xoffset; int xmax = Bitmap.Width - filter.Kernel.GetUpperBound(1); int ymin = -yoffset; int ymax = Bitmap.Height - filter.Kernel.GetUpperBound(0); int row_max = filter.Kernel.GetUpperBound(0); int col_max = filter.Kernel.GetUpperBound(1); for (int x = xmin; x <= xmax; x++) { for (int y = ymin; y <= ymax; y++) { // Skip the pixel if any under the kernel // is completely transparent. bool skip_pixel = false; // Apply the filter to pixel (x, y). float red = 0, green = 0, blue = 0; for (int row = 0; row <= row_max; row++) { for (int col = 0; col <= col_max; col++) { int ix = x + col + xoffset; int iy = y + row + yoffset; byte new_red, new_green, new_blue, new_alpha; this.GetPixel(ix, iy, out new_red, out new_green, out new_blue, out new_alpha); // See if we should skip this pixel. if (new_alpha == 0) { skip_pixel = true; break; } red += new_red * filter.Kernel[row, col]; green += new_green * filter.Kernel[row, col]; blue += new_blue * filter.Kernel[row, col]; } if (skip_pixel) break; } if (!skip_pixel) { // Divide by the weight, add the offset, and // make sure the result is between 0 and 255. red = filter.Offset + red / filter.Weight; if (red < 0) red = 0; if (red > 255) red = 255; green = filter.Offset + green / filter.Weight; if (green < 0) green = 0; if (green > 255) green = 255; blue = filter.Offset + blue / filter.Weight; if (blue < 0) blue = 0; if (blue > 255) blue = 255; // Set the new pixel's value. result.SetPixel(x, y, (byte)red, (byte)green, (byte)blue, this.GetAlpha(x, y)); } } } // Unlock the bitmaps. if (!lock_result) result.UnlockBitmap(); if (!was_locked) this.UnlockBitmap(); // Return the result. return result; } This code loops through the image's pixels applying a filter to each. The only tricky part is figuring out the bounds needed to loop over the pixels correctly. The new version of Bitmap32 also defines several pre-built filters. For example, the following code returns a simple embossing filter.
// A standard embossing filter. public static Filter EmbossingFilter { get { return new Filter() { Weight = 1, Offset = 127, Kernel = new float[,] { {-1, 0, 0}, {0, 0, 0}, {0, 0, 1}, } }; } } When you apply this filter to an area of uniform color, the -1 and 1 entries in the kernel cancel each other out (since the pixels they are under have about the same value) so you get a result close to 0. You then divide by 1 (the weight) and add an offset to move the result toward a neutral gray value. In places where the image has rapidly changing color, the -1 and 1 don't cancel and you get a value that's either a bit lighter or a bit darker than a neutral value. The result gives an embossed appearance. (Note that some of the filters, including the embossing filters, often look better if you convert the image to grayscale before applying the filter.) The main program's ApplyFilter method shown in the following code applies a filter.
// Apply a filter. private void ApplyFilter(Bitmap32.Filter filter) { Bitmap bm = new Bitmap(picVisible.Image); this.Cursor = Cursors.WaitCursor; DateTime start_time = DateTime.Now; // Make a Bitmap24 object. Bitmap32 bm32 = new Bitmap32(bm); // Apply the filter. Bitmap32 new_bm32 = bm32.ApplyFilter(filter, false); // Display the result. picVisible.Image = new_bm32.Bitmap; DateTime stop_time = DateTime.Now; this.Cursor = Cursors.Default; TimeSpan elapsed_time = stop_time - start_time; lblElapsed.Text = elapsed_time.TotalSeconds.ToString("0.000000"); } This code makes a Bitmap32 object to represent the current image. It then calls its ApplyFilter method to apply the filter and then displays the result. In addition to support for these kinds of filters, the new Bitmap32 class provides new Average, Grayscale, ClearRed, ClearGreen, ClearBlue, and Invert methods. I know this is a big program with a lot to absorb, but I don't really want to make this blog entry too terribly huge so I'll add more later. Give the program a try. It's pretty fun! Download the example to experiment with it and to see additional details. |