![[C# Helper]](../banner260x75.png)
|
|
 |
![[Beginning Database Design Solutions, Second Edition]](db2_79x100.png)
![[Beginning Software Engineering, Second Edition]](book_sw_eng2_79x100.png)
![[Essential Algorithms, Second Edition]](book_algs2e_79x100.png)
![[The Modern C# Challenge]](book_csharp_challenge_80x100.jpg)
![[WPF 3d, Three-Dimensional Graphics with WPF and C#]](book_wpf3d_80x100.png)
![[The C# Helper Top 100]](book_top100_80x100.png)
![[Interview Puzzles Dissected]](book_interview_puzzles_80x100.png)
![[C# 24-Hour Trainer]](book_csharp24hr_2e_79x100.jpg)
![[C# 5.0 Programmer's Reference]](book_csharp_prog_ref_80x100.png)
![[MCSD Certification Toolkit (Exam 70-483): Programming in C#]](book_c_cert_80x100.jpg)

Title: Draw 3-dimensional pie slices in C#
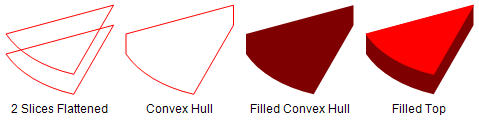
The example Fill and draw pie slices in C# shows how to draw a normal pie slice. Drawing a three-dimensional pie slice is a little harder. This example draws a three-dimensional pie slice in five steps:
The following picture shows the result after steps 2 through 5.
 Those steps work for drawing a single pie slice, but if you want to draw a 3-D pie chart you need to be sure to draw them in the proper order or they will overlap each other strangely. For example, in the first picture in this post the light green slice on the right must be drawn before the red one below it or else it would sit on top of the red slice. To deal with this issue, the program sorts the slices according to their angle with respect to vertical. The angular distance from vertical to the bottom of the light green slice is less than the angular distance to the bottom of the red slice so the green slice is drawn first. If one slice is on the left of the ellipse and another is on the right, then they do not overlap so it doesn't matter which we draw first. For example, the red and dark blue slices in the original picture are on opposite sides of vertical and they don't overlap. The one remaining odd case occurs when a slice is on both the left and right sides of the ellipse, as the orange slice is in the picture. In this program the first slice begins with one edge vertical (the salmon slice) so that can't happen at the top of the ellipse. At the bottom of the ellipse there can be only one slice on both the left and right sides (the orange one) and it can be drawn last. To make sorting the slices easier, this example uses the following Slice class to represent a pie slice.
// Represents a pie slice. private struct Slice : IComparable { public Brush TopBrush, SideBrush; public Pen TopPen; public float StartAngle, SweepAngle, ExplodeDistance; public float ZDistance { get { // Right half of the ellipse. if (StartAngle <= 90) { if (StartAngle + SweepAngle > 90) { // It spans the bottom of the // ellipse so should be last. return 181; } return 90 + StartAngle + SweepAngle; } // Left half of the ellipse. return 270 - StartAngle; } } #region IComparable Members // Compare by ZDistance. public int CompareTo(object obj) { Slice other = (Slice)obj; return ZDistance.CompareTo(other.ZDistance); } #endregion } This class starts with basic pen, brush, and geometric information. The ZDistance method returns the angular distance from vertical to the slice's second edge. Notice how the code treats the special case where the slice is on both the left and right sides. The class implements the IComparable interface to make sorting easier. The CompareTo method simply compares the ZDistance values of two Slice objects and returns a value indicating which is smaller and therefore should be drawn first. The program's Form_Load event handler initializes some random Slice objects. It's fairly long and straightforward so I'm not including it here. Download the code to see how it works. One line in the Form_Load event handler worth mentioning, however, is the last line shown here:
// Sort by ZDistance. Array.Sort(Slices); Because the Slice class implements the IComparable interface, the Array.Sort method can sort the array Slices without any extra code. The Form_Load event handler initializes and sorts the Slices array. The following code shows how the form's Paint event handler draws the slices.
// Draw. private void Form1_Paint(object sender, PaintEventArgs e) { e.Graphics.SmoothingMode = SmoothingMode.AntiAlias; PointF offset_3d = new PointF(0, 20); RectangleF rect = new RectangleF(30, 30, ClientSize.Width - 60 - offset_3d.X, ClientSize.Height - 60 - offset_3d.Y); // Draw the pie slices in sorted order. foreach (Slice slice in Slices) { PieSlice3D(e.Graphics, slice.TopBrush, slice.TopPen, slice.SideBrush, offset_3d, slice.ExplodeDistance, rect, slice.StartAngle, slice.SweepAngle); } } This code creates an offset to indicate how far a 3-D slice's bottom pie slice should be moved below the top slice. It also creates a RectangleF based on the form's size. The code then loops through the Slice objects, calling the PieSlice3D method shown in the following code to draw them.
// Draw a 3-D pie slice. private void PieSlice3D(Graphics gr, Brush top_brush, Pen top_pen, Brush side_brush, PointF offset_3d, float explode_distance, RectangleF rect, float start_angle, float sweep_angle) { // Calculate the explode offset. double explode_angle = (start_angle + sweep_angle / 2f) * Math.PI / 180f; float dx = explode_distance * (float)Math.Cos(explode_angle); float dy = explode_distance * (float)Math.Sin(explode_angle); // Create the top of the side. RectangleF top_rect = new RectangleF( rect.X + dx, rect.Y + dy, rect.Width, rect.Height); GraphicsPath path = new GraphicsPath(); path.AddPie(top_rect, start_angle, sweep_angle); // Create the bottom of the side. RectangleF bottom_rect = new RectangleF( top_rect.X + offset_3d.X, top_rect.Y + offset_3d.Y, rect.Width, rect.Height); path.AddPie(bottom_rect, start_angle, sweep_angle); // Convert the GraphicsPath into a list of points. path.Flatten(); PointF[] path_points = path.PathPoints; List<PointF> points_list = new List<PointF>(path_points); // Make a convex hull. List<PointF> hull_points = Geometry.MakeConvexHull(points_list); // Fill the convex hull. gr.FillPolygon(side_brush, hull_points.ToArray()); // Draw the top. gr.FillPie(top_brush, top_rect, start_angle, sweep_angle); gr.DrawPie(top_pen, top_rect, start_angle, sweep_angle); } This code calculates X and Y explode offsets at an appropriate angle for this slice. It creates a GraphicsPath and uses those offsets together with the 3-D offset to make the top and bottom pie slices. Next the code calls the GraphicsPath object's Flatten method and uses the MakeConvexHull method to get the slices' convex hull. The code fills the hull with the appropriate brush and finishes by filling and outlining the top of the slice with its brush and pen. Download the example to experiment with it and to see additional details. |
![[Draw 3-dimensional pie slices in C#]](howto_3d_pie_slices.png)